An effective sales process in Salesforce can help your sales reps stay on track, gain a deep understanding of your target audience, close deals successfully, and improve the customer experience.
That was a mouthful, but it only scratches the surface of all Salesforce has to offer your sales department. Sales are dynamic. Implementing a solid process that your sales reps can follow will set them up for success and give them the space to be flexible and creative – freedom within boundaries, as they say.
You can start by gaining an in-depth understanding of what a sales process is and how to build one for your business. Empower your sales team to build authentic relationships, provide the right solutions at the correct times, and nurture customers for long-term loyalty.
What is a sales process in Salesforce?
A sales process is a series of repeatable steps your sales team can follow – from initial research to closing deals and upselling.
You can set up your sales process in Salesforce based on your goals, industry, products, and audience. The goal is to move your prospects down the buyer’s journey successfully. That means it should be customer-centric, aiming to educate and empower customers to choose the best solution possible. Your sales process should also be goal-oriented, predictable, repeatable, flexible, and measurable.
In general, a sales process will include four main steps.
- Researching your products, services, and target audience
- Prospecting leads – finding the best candidates for conversions
- Closing deals by pitching your products or services
- Retaining customers by continuing to build trust and loyalty
In the next section, we’ll go more in-depth on each of these stages and break them down further.
The 7-Step Salesforce Sales Process

An effective sales process will be easy to follow, allow you to measure results and forecast sales accurately, and enhance the customer experience.
Keep in mind that your business can – and likely will – build several different sales processes based on different selling strategies. You might take various selling approaches for different situations. However, while you can tweak your approach to suit your needs, it will generally follow a similar flow and include most of these essential steps.
1. Researching
Start by researching and studying these three things to gain the confidence needed to sell effectively and face objections head-on:
1) You should gain expertise regarding what you’re trying to sell. That way, you can answer any questions that arise while engaging with prospects. Try to position yourself as a trusted advisor at this stage.
2) Research your target audience (ideal customers) to understand their pain points, goals, future challenges, behaviors, and communication preferences. In other words, step into your customer’s shoes. Building an ideal customer profile, or buyer persona, helps.
3) Study the competition. Knowing how your solution compares to top competitors is crucial. What can you provide that your competitors can’t? What makes you unique? Why should prospects choose you over them? What does your solution provide, or what challenges does it help overcome?
2. Prospecting
Now that you know your stuff, it’s time to find the people or businesses interested in what you offer (i.e., generate leads). You can pull contacts from various sources, including social media, referrals, your CRM database, email lists, events, ads, Google, and more. Maybe your marketing team also sends you leads they’ve already qualified as “high value” through lead generation campaigns.
This naturally leads us into the next phase: qualifying.
3. Lead Qualification
It’s crucial to qualify your leads before jumping to the sales pitch stage. Often, the best way to do this is by making an introductory phone call where you gather basic information and identify which leads are most likely to make a purchase.
Gather the correct data by posing questions in ways that feel natural and fit into the conversation. Once you’ve gathered the following information, you’ll know if your lead is worth pursuing further.
- What are the prospects’ greatest needs or pain points?
- Can you solve their problem with your solution?
- What’s their budget – or how much money are they willing to spend on a solution?
- Are they looking to make a purchase soon?
- Who must approve the purchase (AKA who’s the decision maker)?
During the call, try to listen more than you speak. Shoot for a listening-talking ratio of 60/40. Asking open-ended questions can help. In a Salesforce State of Sales study, 78% of salespeople say that listening has a substantial impact on converting prospects into customers.
4. Deep Analysis
Now that you have a list of qualified leads to follow up with, it’s time to set up another phone call. This time, you’ll dive deeper into what they need so you can understand if your product or service is a good solution.
This is often called a Discovery Call. Again, the conversation should flow naturally. Never force information or direct a question when it feels inappropriate. Try to pick up on how your contact is feeling as you ask questions like these:
- What are the specific pain points that you need to address?
- How do these issues impact your day-to-day?
- What’s keeping you from finding a permanent solution?
- What solutions have you tried in the past that didn’t work out?
- What does the ideal solution look like to you?
This is when leads will start comparing their options and seeing how you stack up with the competition.
5. Sales Pitch
It’s time to officially pitch your product or service to leads who are genuinely interested. Remember to focus on your potential customer more than what you’re trying to sell. Continue acting as a trusted advisor in this stage and listening intently.
Before the call, run through a list of the most likely objections you’ll face so you have compelling responses prepared. Also be ready to ask follow-up questions when a lead challenges you, so you can thoroughly understand where they’re coming from and counteract their objection with a thoughtful response. Do your best to address any fears and solidify their trust in your solution.
Tailor your pitch to each lead, and focus on the solution and value the solution provides. At the end of your presentation, suggest a timeline that walks through the next steps. Consider sending a contract, proposal, or price quote to your lead before you even make the call. That way, you can close the deal during the call or immediately after.
6. Closing
Directly after your phone call, follow up with your lead via email (or however they prefer to communicate with you). Summarize the conversation you just had and remind them of the next steps in the process. Send them anything you promised in the call (such as additional information on a product or service).
Your lead may respond with a counteroffer or additional questions. Respond as quickly as possible, and encourage them to make their purchase decision by a specific date or time. Send a final quote, negotiation, contract, or any other document required to close the deal.
7. Post Purchase
If you successfully closed the deal, congratulations are in order! You just won a new customer. However, the sales cycle continues with relationship building, upselling, and cross-selling. Ideally, your leads will continue building trust with you over time and gaining your loyalty.
The goal is not just to keep your customers happy but make them even happier – so they can’t help but refer you to others.
How to Build Your Own Sales Process in Salesforce
Now that you understand the seven main stages of the sales process in Salesforce, we’ll show you how to set them up on your platform so you can hit the ground running. Remember to consider these factors while building a process unique to your company:
- Keep your eyes on the prize.
- Understand your buyer’s journey.
- Ensure internal stakeholders are onboard.
- Set up your sales process in Salesforce.
- Allow your sales team to test the process.
- Measure your results over time, and optimize the process for better results.
Follow these steps to set up your sales process in Salesforce:
- Use the search bar to locate the “sales processes” section of your Salesforce platform. Or from “Setup,” go to “Customize,” “Opportunities, and “Sales Processes.”
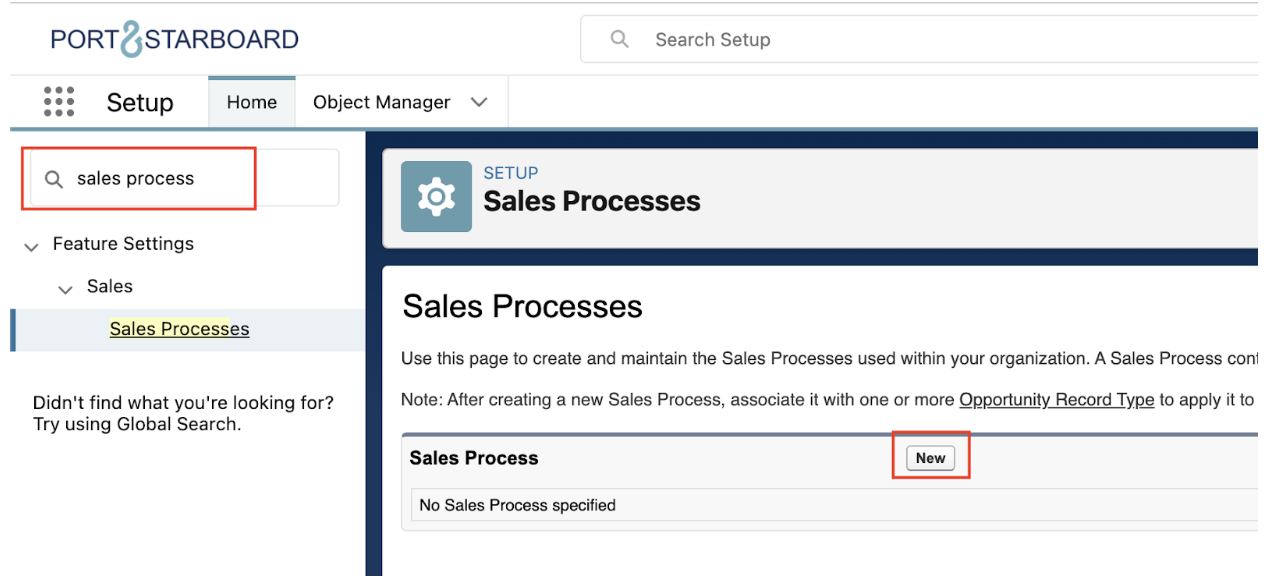
- In the Sales Processes Setup, select “New.”
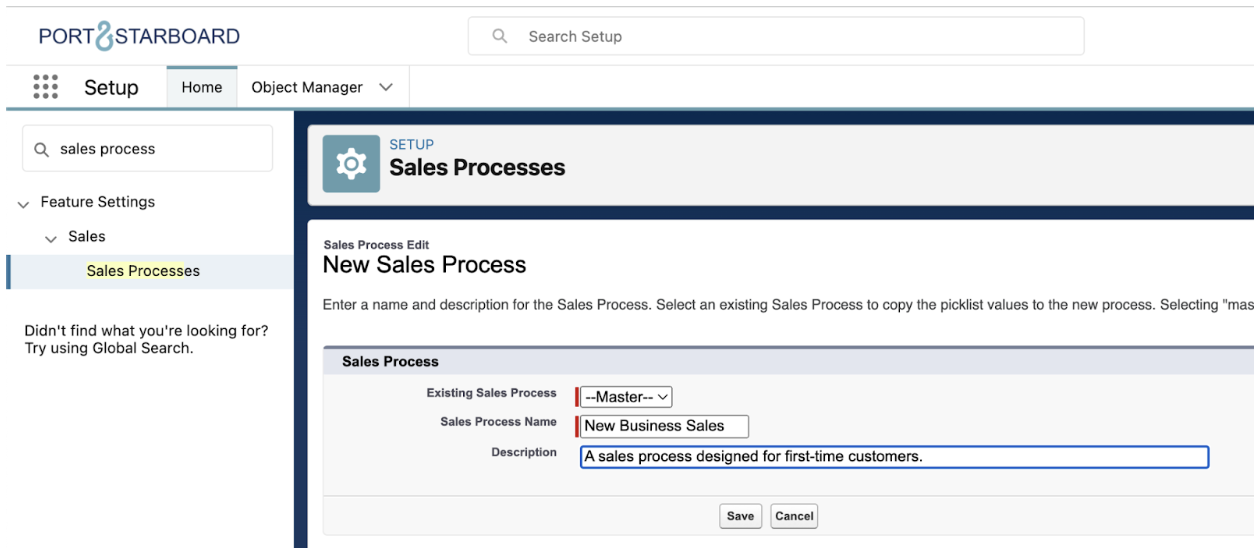
- Locate the “Existing Sales Process” field and select “Master” (if this is your first one). Enter a name and description for your sales process and click “Save.”
- The “Opportunity Stages” screen will appear – where you can select which “Values” you’d like to include in your sales process. All stages will be included by default. You can remove any you don’t want to optimize your process.

- Click “Save,” and you’re all set!
Partner with Port & Starboard for All Your Salesforce Needs
Need help building the best sales process for your business? Or do you have a current sales process that could use some revamping or optimizing? The crew at Port & Starboard would love to come aboard and set your Salesforce platform up for optimum success. Contact us any time to set up a consultation!